Showing posts with label I made something. Show all posts

11.13.2012

No-Sew Curtains

I've been slowly working on our kitchen/living room.  You might remember my mantle updates, and side table makeover.  I've also re-arranged the room a few times and switched around some rugs, but of course failed to blog about it.  But for the past month or more, my heart has been set on updating the curtains.

When we first moved in, I put up the white curtains we already owned.  They were cheap ones from Ikea, and long enough for our tall windows.  Plus, I was trying to make do, I didn't want to rush an buy something just to have something.  Well, the curtains were a bit too long.  The kiddos stepped on them, they dragged on the floor, and as expected, the bottom hem got disgusting.  So one day, in a fit of despair, I trimmed the bottom with scissors.  And that is how they have been for 3 months.  Additionally, the white curtains with light colored walls began to wear on me.  All the furniture is neutral colored, so the whole room felt blah.  My search for window coverings began.

I quickly found that purchasing drapes would be rather expensive, especially since my windows are tall.  Standard 84 inch curtains won't cut it.  So I decided to look for fabric.  I have heard and read about making no-sew curtains and that sounds like a cheap way to get exactly what I wanted.  Tracking down the fabric became the hard part.  I have since discovered that there are not many places to purchase fabric in my area, no Joanne's, Calico Corner, Hancock, nothing.  There is one designer fabric store that I found, but I'm not really interested in paying 25 dollars a yard and up.  I browsed Fabric.com and found a few options, but still was anxious about paying $13 a yard (I needed 6 panels).  So finally, I decided to check at Walmart.  Luckily, they had a small fabric section.  I discovered a cream and oatmeal ticking stripe in a heavy weight cotton.  Now I love stripes, maybe borderline obsessed with ticking stripe.  This was it, as long as there was enough yards.  It came down to the wire, I thought I might need 18 yards and this was just over 17, but I took it all.

So, to make the curtains, I gathered a few materials and followed some simple steps.  Here is what I used:

A tape measure, fabric scissors, fabric glue, and an iron.


  1. First, I measured out the length I needed for each panel, plus 2 inches for hem.
  2. Cut each panel.  I kept the tape measure out to the appropriate length on the floor and measured the fabric.  I aligned the end I needed to cut with a line on my hardwood floor so I kept a straight edge.
  3. Fold over the hem and iron to crease a straight edge. Place glue along hem and push fabric together with fingers.
  4. Let dry minimum of 30 minutes.
  5. Repeat for each panel.
Now to hang, I used drapery rings with clips.


It turned out much better than I expected.  I love the look it adds to the windows.  Since we have blinds, and the windows all face the backyard, I don't plan on closing the curtains.  As a result, I am able to get away with less width for my panels.

Here is a close up of the ticking stripe:


I love how it turned out, and it was so much less expensive than buying curtains!  I'm ready to tackle another room!

Any of you buy fabric online?  Where is your go-to for curtains?  I'd love to hear from you!

10.30.2012

Pillow Crazy

I have an addiction to pillows.  More specifically, pillow covers.  I adore how they change the feeling of the mood and are less effort than painting.  Recently, I was inspired by a tutorial on Pinterest to create my own personalized pillow cover.  Check that our here.

I used a fabric marker found at Michaels, a pillow cover from Ikea, a stencil, and a tape measure.


I chose this quote, also found on Pinterest.  No, I really don't have any creative ideas of my own.

"Never get tired of doing little things for others. Sometimes these little things occupy the biggest part of their hearts."

It took me about an hour to measure and stencil.  I think I'm just slow.  I let it set overnight and ironed it a few days later.

Here is my result.


I am thrilled with how it turned out,  It's much better than I expected.  I think it might look better if I chose a longer quote or used a smaller pillow cover, but hey, you work with what you got.

9.27.2012

So I Wanna be Artsy

If there is one thing I wish I could do well, it is paint. I've always been fascinated by art, especially paintings. It doesn't matter if it is oil, watercolor, still life, or abstract.  I wish I took art classes and had my own sunny corner studio to step an easel.  It seems utterly romantic.  Recently, as I was browsing Michael's trying to figure out how to recreate something I saw on Pinterest, I decided to buy some acrylic paint and a canvas and try.  Now, six canvases and several bottles of paint later, I can say I've tried.  And here's what I have to prove it.


This is my first project.  I got the idea from a bottle of perfume I own, Twirl, by Kate Spade.  The bottle has gold polka dots scattered over the bottle, being more concentrated at the bottom.  Apparently, there is also china in the same pattern, and I saw a pin on Pinterest where someone put gold dots on a canvas.  I prefer cool tones and wanted some art for my living room, so I picked out two shades of blue/green paint, purchased a canvas (actually two in case I messed up) and a circle stencil.  I drew the circles in pencil and filled them in with paint.  I had to do several coats, so the whole project took a few hours with drying time.  It's definitely not perfect, but it makes me happy.


I also made this one from a pin.  I painted a white canvas with chalkboard paint and used a stencil.  There is no way I can letter that nicely, especially with a brush.  I love how it turned out.


This little guy I simply made while messing around.  Yes, I really like blue, so I used three colors of blue and mixed in some silver and taupe.  I blended and dabbed to my hearts content.  I had no vision, just wanted something blue and fluid to go on my mantle.  So there you have it.

I got lucky, I purchased the paint at 40% off, and the canvases were buy one get one free.  Without the sale, I'm not sure I would have took the plunge.  I find painting relaxing and take great pleasure in it.  I hope I can continue my new hobby, even though it means late nights for me.  I'm not ready to paint while my kiddos are awake. 

Any other creative wannabes out there?  I love the idea of creating something special for our home, something my kiddos will remember someday, and maybe fight over to have in their house.  Ha.  Forget I said that, I don't want to think about my kiddos growing up!  Seriously, though, what do you do to decorate and make your home meaningful?

9.24.2012

How To Make a Body Scrub from Your Kitchen

I am such a girly girl.  I love feeling beautiful and experimenting with my "look".  I adore make-up, fragrances, and playing with my hair.  Unfortunately, these things add up in terms of money, storage space, and time.  I have gone through many phases where I purge all or most of my products to reduce inventory down to my absolute favorites.  However, in no time, my tastes change and I am in want of a new product.  I really try to buy quality products over quantity, one reason why I love my Birchbox subscription.  I love trying new things without regretting a full-size purchase.  When I'm having a bad day or need some alone time, I enjoy locking myself in the bathroom and spending hours re-styling my hair, trying out new eyeshadow, or giving myself a manicure.
Recently, I have also found a new love in creating things, such as artwork for the walls or painting furniture.  I decided to try my hand at spa products, specifically, scrubs.  It seems the easiest to start with, and I wanted to see if I could things I have on hand, that way in case I failed I wouldn't have wasted too much money.  I started by doing a Google search, then altered to recipes to what I had in my kitchen.

Face Scrub
Brown sugar
olive oil
honey
Honestly, I didn't measure anything.  I used a spoonful or two of sugar and added in a bit of honey, then the oil.  More oil then honey.  I mixed it in a small gladware container to take with me to the shower.


I chose sugar over salt because its supposed to be gentler on the skin.  I slathered it on my face while I was in the shower.  I scrubbed a bit, then let it sit while I did a different scrub on my body.  After a few minutes, I rinsed it off.  My skin was super soft and smooth.  I don't think its something I should do everyday, but maybe once or twice a week.  I might try it with a different oil, maybe coconut, almond or grapeseed.  I could even add essential oil if I feel fancy and want fragrance.  I'm certain I will try this again.

Body Scrub
coffee grounds
white sugar
dash of cinnamon
splash of vanilla
olive oil
Again, I didn't really measure this out.  Have you figured out I don't have the patience for precision?  I suppose because my job requires it I throw it out the window at home.  Anyway, I used about half as much sugar as I did coffee grounds.  Just a bit of cinnamon and vanilla for scent, and enough oil to coat it all.  My mixture was not soupy by any means, just clumpy.  Both the sugar and coffee grounds act as an exfoliater, but the caffeine in the coffee is a vasoconstrictor and cellulite re-distributor.  It helps diminish the appearance of varicose veins  I'm not sure how much of this is true, but it definitely softens this skin and smells awesome in the shower, as long as you like coffee, I suppose.
However, I will warn you, this made a mess in my shower.  There are coffee grounds EVERYWHERE.  While sugar and salt will dissolve in water and be flushed away, the coffee grounds will not.  Plus, the dark color against my white shower make the evidence all the more obvious.  Point being, don't plan on keeping this a secret from your hubby unless you also block time to clean the shower afterwards.  But that erases all relaxing/spa-like quality time you just had.  Just sayin.
Overall, I really liked the outcome of both treatments and have made a second batch of almond oil and brown sugar. Let me know if you try these or come up with a better recipe. I'd love to hear your beauty secrets.

8.31.2012

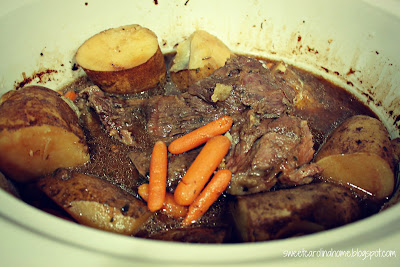
Favorite Pot Roast

I love pot roast. I mean, I really love it.  For me, its the definition of comfort food.  And I love it so much, I thought I would share my recipe.  It has taken me a while to tweak it.  I had to learn which cut of meat works best, and how to season it.  Plus, what to serve with it.  So here is my secret.  Or maybe its not a secret and you already know this.  Which if that's the case, why haven't you shared?
  • The Meat Hubby says a chuck roast is the best.  My stomach agrees.
  • Method  Crock pot.  Because I am lazy and love to do stuff other than standing in the kitchen.
  • Seasoning  McCormick Pot Roast Seasoning Packet.  Seriously, its the best.  I like to mix it with a can of beef broth instead of water.  I've tried other seasonings, beef stew, onion soup etc, but this one is the best.  I promise.
  • Add ins  Baby Carrots, potatoes, celery, onion optional
  • Serve with Kings Hawaiian Rolls.  Seriously, they are uh-mazing.


I add all the ingredients (except rolls) in the crock pot and cook on low for about 8 hours.  My house smells delicious and I thank myself for planning ahead. End of story.

Do you have a comfort food?  What's your go-to easy meal?

8.21.2012

Side Table Switch-up

I bought this table at Target after stalking it for a few months.  I think it was one of my first purchases for the new house.  He went on sale and I knew it was meant to be.  I've seen him on Pinterest recently, masquerading as a upside-down spray painted trash can.  But I know he really hails from Target.


He's lived in the my bedroom as a nightstand, but he was too short.  So I moved him to the living room.  Besides, he's too lovely to be hidden away.  I recently decided his curves needed definition.  The black metal is holding him back from his full potential.  So I did what any girl would do, I found a leftover can of spray paint.  We had a date in the backyard while the kiddos napped.


What do you think?  Totally worth the turquoise fingers, right?  I knew he had potential, but now I can't stop staring at him.  I'm in love.

8.10.2012

Homemade Laundry Soap

So I realize this post is proof of how un-original I am.  I admit, I am a bit slow when it comes to trends; actually, resistant might be a better word.  Changing my habits simply because everyone else has tried it doesn't sit so well with me.  Perhaps, its because I'd rather watch others fail with the new stuff before I try my hand at it.  Anyway, point being that I've seen, read, and heard of many others making their own laundry soap concoction, so I figured its safe enough for me.

For starters, I started dropping hints to my hubby.  If there is one person that makes me seem like a risk-taker, its him.  In his mind, only green/crunchy/poor/mentally unbalanced, or a combination of the above would even want to attempt to make laundry soap.  I casually mentioned the idea for about a week.  I mentioned things like cheap ingredients and 5 minute prep time and low cost per load, and avoided saying i read on a blog and pinterest.  Finally, I decided it was pre-conditioned enough that I could just buy the stuff and make it.  He had enough warning.

I will add that I first saw the idea on Pinterest.  I never pinned it.  Then, I heard a co-worker rave about how she loves her homemade laundry detergent.  Shortly after, a friend of mine blogged about it.  And tweeted it.  I did a Google search, and a Pinterest search.  The concept became less weird for me.  You know what settled it?  I discovered I could pick my own bar of soap, which meant I could pick my own scent.  That's what nailed the lid in the coffin.  I'm serious, fragrance is that important to me.


I used the recipe from my friend Rachael.  I made a special trip to Walmart to pick up the ingredients.  I normally avoid Walmart like the plague, but I didn't have much of a choice since Target didn't carry the Washing Soda.  Once I got home, it took me 5 minutes to make.  Literally.
  • 1 cup of Borax (3-4 dollars)
  • 1 cup of Washing Soda (3-4 dollars)
  • 1 cup of OxyClean (6 to 8 dollars)
  • 1 bar of soap, grated (1 dollar, and yes, I used my cheese grater)
Mix ingredients and place in container.  Make the container cute, because you can.  I tied pink string on mine.  I also tied pink string on the tablespoon I placed inside for measuring.  I like pink.  In case you are wondering, I used oatmeal and almond scented soap.  I am addicted to almond and amaretto at the moment.  Oh, and this makes about 45 loads if you use a tablespoon per load.  I, errr I mean, my hubby, does a lot of kiddo laundry (which equals small loads) so we only use 1/2 tablespoon for those.

Thus far, I have very little complaints.  We do have a top-loading HE washer, but the soap is low sudsing and we haven't had an issue.

Anyway, this concludes my story of how I joined the cool kids and made my own laundry detergent.  Anyone else out there on the cool side of the laundry club?  Or are you of the school of thought only crazy people grate soap with a cheese grater?  Tell me about it.

5.09.2012

Cheap House Project #2

Every Princess needs a mirror in her room, right?  Well, my Princess is no exception.  So when my former neighbor offered up this wicker mirror for FREE I snapped it up.  I mean, I didn't think it was cute, but I've been wanting to try my hand at spray painting and witnessing a transformation of ugly furniture, so I thought it was worth a go.


It didn't take long, just a few quick coats.  I didn't even prime it.

ignore the bad lighting, please

Hubby hung it over her dresser.  Now its light, and fresh, and perfect for my little girl to stand on her bed and make faces in.  Is that worth the 4 dollars in spray paint?  I think so.

5.04.2012

Cheap House Project #1

Moving in can be expensive.  I'm trying to keep it cheap.  We are blessed to have bought a large house, but are faced with not having furniture to fill it.  Plus, I'm still on the whole get-out-of-debt thing.  Which means I am learning how to become more creative with my house decor.  Enter project number one.

We don't have night stands.  The last place we used bookshelves, and were fortunate to have sconces built in.  Now we don't.  However, I do have an old occasional table (from Target clearance, where else?)  It was dark and dinged up, so I decided to spray paint it and lighten the look.


Here it is in our previous house. 

It took several coats.  I used a primer, then gray paint, then a gloss top coat for extra durability.  Over the course of about a week (I had my work schedule and rain to contend with) we had a new night stand!


Its a light gray, and in person its more of a blue-gray.


It's functional and only cost me a few dollars for spray paint.
What do you think?

3.22.2012

Cake Pop How-To

As you may remember from Princess' birthday party, I made cake pops.  Here is how I did it.  Of course, I  started by google-ing for recipes and how-to's and adapted what I think would work for me.

To make cake pops, start with a cake.  I am lazy and made a box cake.  If you are baking whiz, you should make one from scratch, just don't gloat about it.


I made it the night before and let it cool.  The next day, I crumbled it up.  I utilized a few different methods, scraping with a fork, using my fingers, etc.  I found that rubbing cake chunks against themselves worked the best.  The goal is to have small crumbs, no large chunks.


Then, add in the frosting.  Again, I am game for the easiest route, so I chose pre-made frosting.  I used half the can, then added a bit more.  The mixture should be moist, but not too sticky.


Next, roll the cake in balls and place on baking sheets lined with wax paper.  Once this process is complete, place in the refrigerator for a few hours or the freezer for 20 to 30 minutes.  The cake should be firm enough to dip.


I chose to dip the pops in candy melts.  I wanted pink and purple pops for my Princess and the candies are easy to melt in the microwave.  And I think we've established I'm all for easy.  I did find the melted mixture was bit thick, so I had to thin it out with some vegetable oil.


I forgot to take pictures of the next part.  You'll have to use your imagination.

First, I recommend dipping the stick in the melted mess before placing in the ball.  It will help keep the pop on the stick once upright.  Then, immerse the cake pop in the candy melt.  I used two spoons to help make sure it was covered completely.  Let the excess drip off, then place upright until set.  I used a floral foam block.

You're bound to have a few that don't work.  One's that fall off or split.  That's your treat.


I chose to display them in a floral foam orb on a cake stand.  It doesn't look that pretty, but it works.


And of course I pretended to be fancy and drizzled the tops with alternating colors of candy melt.  I should note that my hubby chose to dip some in melted chocolate, but they weren't done at press time.  He simply melted chocolate chips and some vegetable oil.  They were yummy, but lacked the crunch of the candy coating.


Overall, it was a lot of work for a small treat.  However, my daughter loved them and I enjoyed making something special for her birthday.  Have you ever made cake pops or something similar?  I'd love to hear the details.

1.16.2012

Pretty Hairpin Tutorial


Like most of my good ideas, I'm pretty sure this one came from pinterest, although I didn't pin it at the time and my subsequent searches have been unsuccessful.  It's a pretty basic idea, just paint bobby pins.  I chose to use nail polish because its the only kind of paint I have lying around in multiple colors, plus it dries quickly.  So here ya go:

12.21.2011

Sugar High

Its that time of year when I like to bake.  I feel like I can go all out and give it away and no one will complain of all the sweets because its Christmas.  I kinda went overboard this year, for a few reasons.

Have I told you I finally have a permanent store to work in?  Well, I do.  I also got a promotion at the same time.  So, I'm the manager of about 17 people in my department.  And of course this happened right before Christmas.  My first Christmas in this district, so I really don't know how they handle things around here.  My last few managers were pretty generous, and I would love to be, the problem is I didn't anticipate this and haven't really budgeted for it.  However, I really want to do something.  I found a small trinket for each employee ( a slinky! doesn't everyone love a slinky?) and I decided to make sweets.  Its a bribe, so they will like me and listen to me.  I'm crossing my fingers it works.

Making sweet treats before Christmas is a festive thing to do.  I remember my momma doing it, I enjoy doing it, and it puts me in a Christmas-y mood.  Fair enough?

The blogging world is full of recipes and deceptively delicious photos.  They all make it look so easy.  So I chose a few recipes to try.
  • Toffee  (found here)
  • Chocolate covered pretzels
  • Chocolate chip cookie dough truffles  (found here)
  • Classic fudge  (found here)  ( I use milk chocolate chips)
  • Sugar cookies with icing
Chocolate covered pretzels
Fudge, cookies dipped in chocolate, toffee
Cookie dough truffle
Don't they look divine?  I love it when food looks pretty and tastes yummy.  Three of these I've made before and know how they turn out.  The toffee and truffles were new to me.  I am on chocolate overload.  I can't tell you how many times I've washed my hands and STILL have chocolate under my fingernails.  I boxed up goodies in festive tins with tissue paper to take to work. 


My refrigerator is still full with the sweets that won't fit.  I wished my Hubby worked out of the home so I could send some to his work.  It looks like chocolate is for dinner this week.  Anyone else eating chocolate three meals a day?

12.08.2011

Tree Skirt Tutorial

I don't know if this really counts as a tutorial.  I mean, it really only has one step and two supplies.
  • round tablecloth ( I used a 70inch one from Target)
  • scissors
Lay tablecloth out on floor.  Make one cut from edge to center, preferably straight.  You can measure if you want, or if your impatient like me, simply cut along a crease leftover from the fabric being folded in the package. Super easy and takes no time at all.


Why do this?  Have you seen how much tree skirts are?  Have you ever compared them to tablecloths?  It's essentially the same thing.  Except I think tree skirts are tacky and expensive.  A classy tablecloth is more my style.  Plus, I like to change up the look every few years, so I need inventory to chose from.  And I can't sew/afraid to try.  Cutting things with scissors is more my style.


 I love my tree shirt that only set me back 14 dollars!  And if I change my color scheme again next year or my kids destroy it, I really won't be that upset.